What do I need for this?
-
A personal internet connection at your home. You need a router connected to the internet that has ethernet ports on it. Unfortunately, this is a bottleneck in terms of economic accessibility, but I am working on that.
- An ethernet cable while we’re talking about that, I guess.
-
Some kind of development environment (this just means a computer), but it needs
-
A micro SD card port or adapter. You can buy some janky crap from Amazon, and that’s FINE! I GUESS! But if you’re cool like me you’re on your Framework 16 laptop, and you can just pop in the micro SD reader expansion module. They’re not paying me to link that, but they should. Give me an affiliate code, Framework!
-
A code editor of some kind. Most people use VS Code, but I hate it. However I use neovim because I am a sad, broken old man who harbors, nay, nurtures, a petty hatred for every major technology corporation. You’ll be like me someday, if you live long enough.
-
An internet connection. You can maybe figure out how to do this entirely offline, but if you can you probably don’t need any part of these instructions.
-
A raspberry pi. I have a Raspberry Pi 4 and a sickass Raspberry Pi 400 and all these steps work on both of those. They probably work even better on a Raspberry Pi 5, but I don’t have one of those. You basically just need a tiny little computer, and this is a tiny little computer. I just bought a 32GB micro SD to install a new OS on mine. That’s more than enough space for what we’re doing. Just get the cheapest micro SD you can find. You need less than 5GB for the OS, and the web server stuff is absolutely miniscule.
-
The Golang compiler (install this on your "development environment" computer, not your raspberry pi), the server bit will be written in go, and we’re going to compile it to binary to run on the raspberry pi. It’s super simple. Don’t worry. Computers are easy.
-
-
I already spoiled this, but my hardware is the aforementioned Framework 16 (dev environment) with Ubuntu 24.04 LTS and I’m pushing this mess to my Raspberry Pi 4
-
If you’re on a mac I think all the terminal commands I give you will work, but I can’t be sure because I would rather be flayed alive than give Apple $1. You will want to Xcode
-
If you’re on Windows 10+ I also think you’re OK thanks to Windows Subsystem for Linux, but I recommend installing Git for Windows (which is actually a bash terminal, but it also installs git)
-
An Ethernet cable for connecting your Raspberry Pi to your home router.
Make it into a web server
Ok, so step 1 is to make your raspberry pi into a web server. I have no idea what operating system they come with any more, so we’re going to install a fresh one. I should have said this above, but now you need the Raspberry Pi Imager.
My Raspberry Pi 4 has a 32 bit ARM chip. I don’t know how to tell you how to
figure out what chip your rpi has. I hope you can google it on Duck Duck Go.
I’m going to install Raspberry Pi OS Lite, 64-bit. Go with 32 bit if that’s
your chip architecture. Make smart choices.
This operating system is a port of Debian, which is
the basis of Ubuntu, which is the flavor
of Linux I use on my personal computer.
Linux is a free and open source
operating system. If you want to be a Good Computer User like me, I highly
recommend obtaining a Linux computer. I have built like 4 of them out of parts
I found in the garbage.
It says right on it, “No desktop environment.” A desktop environment is what
you might know as a GUI (graphical user interface), or the thing that lets you
move a mouse cursor around a screen and click on things. You can’t do that on
this OS, but don’t worry. We’re going to use TERMINALS!
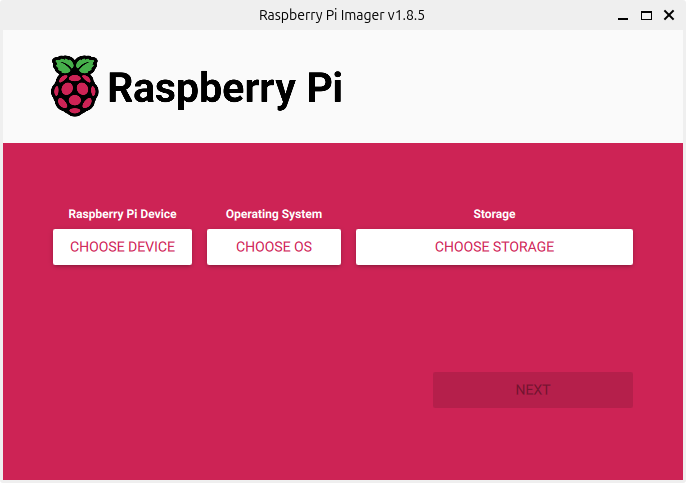
- Put your micro SD card in the reader
- Open the Raspberry Pi Imager
- Select your device
- Select Raspberry Pi OS Lite (whatever-bit)
- Select your micro SD as the Storage
- IMPORTANT! When it asks if you’d like to customize some settings, SAY YES! Give it a hostname you like (this is the name of the computer when viewed from the network). Give it a username and password you can remember. Go to the “Services” tab
- Go to the SERVICES tab and check Enable SSH. This is what will let us access
the little buddy once it's online.
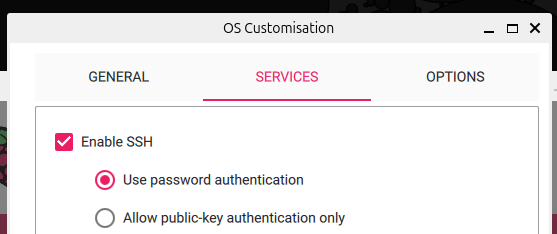
- if you select "Use password authentication" it will ask you for the password you set up in the previous step each time you try to connect, but you'll be able to connect from any computer. If you select "Allow public-key authentication only" you won't have to type the password you set up, but you'll only be able to access the raspberry pi from the computer where you're running the Imager (this is how I have it set up. It's more secure, but if I ever lose this laptop I have to totally re-image the raspberry pi {which i do all the time}).
- Flash that OS to the SD card.
Connect it to your network
- Stick that SD card into your Raspberry Pi. Connect your Raspberry Pi’s ethernet port to your router’s ethernet port with an ethernet cable, and power it on.
- Log into your router’s admin interface. If you already know how to do this,
skip to the next step. If you don’t, hopefully this helps. If someone from
your internet service provider told you it’s impossible to log in to your
router, they are liars. Here’s some things to try:
- If you’re on Linux (good boy/girl/puppy), open a terminal (Ctrl + Alt + T)
and input “ip r”
- This might print more than one line. The one you care about starts with “default”

- In the screenshot, my router’s IP address is 192.168.99.1
- If you’re on a Mac, open a terminal (Cmd+space to open Spotlight search,
type Terminal) and input “route -n get default”
- The gateway: is the address of your router

- If you’re on Windows, open Git Bash if you installed it, Powershell if
you’re one of those weirdos, or cmd if you’re REALLY nasty, and type “ipconfig”
- This will print out some information about your network connection that I don’t fully remember because I haven’t used Windows in a long time, but one of the things it will tell you is your “gateway” which is the IP address of the router you’re connected to.

- If you’re on Linux (good boy/girl/puppy), open a terminal (Ctrl + Alt + T)
and input “ip r”
- Type your gateway’s address into your browser as if it were a web address.

- You should get some kind of administrator login page. The username and password are (in my experience) almost always printed on a sticker somewhere on the actual router device. Feel free to change them once you are logged in, but if you forget the new password you set up you have to reset your router to factory settings so you can log back in with the one on the sticker.
- Now that you have accessed your router, find the IP address of your raspberry
pi. You can recognize it by whatever host name you gave it in the “custom
settings” step of the Pi Imager business. For instance, here's mine:
- Make a note of your Pi’s IP address. You’ll need it for multiple steps later.

Write the code for a little web server
Here is all
the code you need to build a (VERY) little web server in Go. This just serves
static files from a folder called static/ and if you don’t know what any of
that means, here are some step-by-step instructions:
- In your terminal of choice type
go version- If you see
go version go1.22.4 linux/amd64or something similar, proceed to next steps - If you get an error, go back to the “What do I need for this?” section and install the go compiler, then come back here.
- If you see
- Type
mkdir host_a_server_from_home- This will create a new “folder” or directory. You don’t have to call it
“host_a_server_from_home”. You can call it whatever you want.
mkdiris the command for “make directory”
- This will create a new “folder” or directory. You don’t have to call it
“host_a_server_from_home”. You can call it whatever you want.
- Type
cd host_a_server_from_home(replace the folder name with whatever you ended up choosing in the previous step).cdis the command “change directory”, and the argument to that command is the relative path to the directory you want to change to.- When you open a terminal, you are usually “in” your home directory. If your username on your computer is “yeti” for example, your home directory is on the path “/home/yeti/”. This means that at the path “/” which is the “root” of your file system (which is a directed, rooted tree graph, but you don’t need to know about that), there is a directory “home/” and inside the “home/” directory is the directory “yeti/”
- Create your go module by typing
go mod init pi_servergo mod initis the real magic here, “piserver” is just what I chose to name _my module. You can name yours whatever you want.- You should have a new file called “go.mod”. You will usually not edit this file directly. It just contains metadata about your module for the Go compiler.
- Now open your code editor “in” this directory. If you have VS Code on
Windows or Mac, you can just open it the normal way and then do
“File > Open > <this folder>”, if you have it on Linux, I think you can
type
code .(code space dot) into your terminal and open it from there. I am a vim psycho, so I open my code editor by typingnvim .into the terminal - Create a new file called main.go
- On the first line of this file type
package main - A couple lines down begin our main function by typing
func main() {}. If you’re cool, your code editor will probably auto-complete the parentheses and brackets, if not more. There might be an AI trying to guess what you want to do and offering to auto-complete many lines of code for you. In my experience, those are usually wrong. I suggest turning it off if you can figure out how. - Just to clarify, “()” are parentheses, and for your main function they should have nothing between them. “{}” are “brackets” or “curly braces”. The first one is the “opening”, and the second one is “closing”.
- If you put your cursor between the curly braces and press “Enter” or “Return”, your editor should insert a new line, automatically indent your cursor on the new line, and push the “closing” curly brace to an even newer line beneath your cursor. So your cursor is now “inside” of the curly braces, the line is indented to help you visually identify the “body” of the main function. The body is just all of the code the function will run.
- Inside of the main function body (where your cursor already is) type
var fs http.FileSystem = http.Dir(“static/”)- This code is saying:
var fs: “label an address in memory withfsso I can refer to it multiple times”http.FileSystem: “the information to store at that address will be encoded according to the definition in thehttplibrary’sFileSystemtype”= http.Dir(“static/”): encode aFileSystemconnected to my module’s local directory called “static”
- This code is saying:
- On the next line type
fileServer := http.FileServer(fs)- This code is saying:
fileServer :=: The:=operator (colon equals, or as I like to call it, balls equals) is Golang shorthand for “label an address in memory withfileServer, the information to store at that address will be encoded according to the definition of the type of whatever expression is to the right of the:=symbol”http.FileServer(fs): define a function according to the rules defined in the http library’sFileServermethod
- This code is saying:
- Finally, on a new line type
http.ListenAndServe(“:8080”, nil)- This code is saying to use the http library’s ListenAndServe method to “listen” for network requests on the host machine’s port 8080. The host machine is whatever computer is running this code. All of the computers we’re working with in this tutorial have a component called a network adapter. This lets them make requests over the network (like to the internet) and receive requests from the network. Remember when we typed the router’s IP address into the web browser and got an admin page? That worked because the router is a little computer, and it has a program similar to the one you just wrote that listens on its “host” (your router) on port 80, and responds with an HTML document that your browser can interpret into a user interface.
- I didn’t have you specify port 80 when you made the request to your router because the browser itself specifies a protocol, or a set or rules, called HTTP. The Hyper Text Transfer Protocol. One of the rules those rules is that when a network adapter gets a request where HTTP is the specified protocol, but no port number was specified, to send the request to whatever program is listening on port 80. 80 is the “default port” for HTTP.
- Okay, one last thing, and then you can see something cool. Create a new
folder in your project called “static”. So if you named your project
“host_a_server_from_home” you should now have something like
- host_a_server_from_home: the folder containing your project files
- go.mod: the aforementioned metadata file (sometimes called a “manifest”)
- main.go: the code to run your server
- static/: the new folder you just made
- host_a_server_from_home: the folder containing your project files
- Inside of the static/ folder create a new file called index.html
- In the index.html file write this:
<p>If you are reading this on a browser, I am a badass web developer.</p>- This is a coding language called Hyper Text Markup Language, or HTML. It is saying to place the “If you are reading this…” text inside of a “paragraph” tag. The browser will render this text as a paragraph.
- Okay, go back to your terminal. If you are in the static/ directory, type
cd ..(change directory to my current directory’s parent) to return to the “host_a_web_server_from_home” folder. - If you type
lsin your terminal and see your main.go file, you are in the right place. - Type
go run main.go- Your terminal might kind of look like it is frozen. That’s okay.
- Open a browser and type into the address bar: localhost:8080
Put the web server in the micro computer
Sometimes when people say "server" they mean "the computer where the website lives", but we're going to use some more precise terms.
- Server: is the program that can receive network requests and respond to them in a specific way. In this project, the server will respond by sending a file.
- Host: this is how we will refer to the actual computer where the server program is living. The server is software, and the host is hardware.
At the end of the previous step, you have a server running "locally" in "dev mode".
- Locally: means that the host in this case is the computer you use for development.
- Dev mode: means the software is executing in a way that helps you develop more
quickly. In the case of
go run ...it lets you skip the steps of building the executable and then executing it. - Executable: a single file containing a binary instruction set that can be executed directly by the operating system without the need for an intermediary process.
But speaking of building the executable. That is the first step in putting this server on your raspberry pi host. My raspberry pi 4 has a chip with ARM 64 architecture. Yours probably also does (as of this post, the raspberry pi 5 also has ARM 64), but I'll do a separate post for how to figure out your chip's architecture in case anyone needs it.
To stop your local server running in dev mode, click back to your terminal where it is running and press ctrl + c (Control C is the "kill signal" and can usually be used to interrupt whatever program is running in the terminal.
Next, in the same terminal, type GOOS=linux GOARCH=arm64 go build -o my_server ./main.go
If you type ls after this finishes, you should see a new file called "my_server".
Here's what that command did:
- GOOS=linux: this tells the go compiler that we're building a binary for the
Linux kernel.
- a kernel is the "lowest" set of rules an operating system follows for interacting with the physical components of a computer.
- GOARCH=arm64: now we've told the go compiler that we're building a binary for a chip (CPU) with 64 bit ARM architecture.
- go build: In case it's not obvious, this is the part of the command that
tellstells the go compiler to actually build the binary. The instructions we
typed before this are called Environment variables,
and they are one way to inject information into a program. If we didn't set
these variables and just ran the
go buildpart of the command, the compiler would assume you're building a binary for your development environment. - -o my_server: the
-ois called an "option flag", and this one is short for "output". We are saying "name the output file my_server". You don't have to use "my_server" if you don't want to. This part is customizable. If you want to re-do the command with a different output file name, you can remove the existing "my_server" file with the commandrm my_server(rmis the command for "remove") and then do the command again with your choice of file name.
To push this file from your development machine to the raspberry pi, we are going to use a technology called rsync
You can see if you already have it installed by typing which rsync into your
terminal. If you see anything besides an error or nothing, you probably have
rsync. If you don't, go to the site I linked above and install it.
This is a technology that lets us copy files from one computer to another over a network using a protocol called SSH. A protocol in computer science is basically a description of how to write a program. Protocols are a tool for telling developers (like you!) how to write a program that does the same thing as a program some other developer wrote in a different language or for a different platform. A good example is HTTP, the Hyper Text Transfer Protocol. Basically every modern programming language has implemented this protocol in its own way, and yet they are all interoperable.
For this step, you'll need the IP address of your raspberry pi that you obtained in the previous step connect it to your network.
For this example, we will pretend that IP address is 192.168.99.72 and the
server file you made was called "my_server", and the user account you defined
in the web host was "yeti".
Type into your terminal rsync my_server 192.168.99.72:/home/yeti/
If you did not tic the "Allow public-key authentication only" button up in the make it a server step, you'll be prompted for whatever password you set up when you did the raspberry pi imager stuff.
Once that is finished, do rsync -r static/ 192.168.99.72:/home/yeti/ to push
the "static/" directory, and the index.html file inside of it.
Let's break down those commands.
rsync my_server 192.168.99.72: is saying, "i want to copy the file
'my_server' to the computer at network address 192.168.99.72".
:/home/yeti/: is giving the location in that computer's file system to which
you want 'my_server' copied.
rsync -r static/: Remember, in the root of our project, we have a folder
called "static/" and inside of that is a file called "index.html". This command
says, "copy the static/ directory and everything inside of it"...
The -r part is a "command line argument". Command line arguments are a way
to give some extra instructions to the program you're running from the
command line. Different programs define their own command line arguments, but
there is a kind of standard that people who write these programs try to follow.
The -r argument usually means "recursive" which basically just means, "keep
doing the thing until you're done." In this context it means, "sync the static
directory and also any files in it and also any directories in it and also any
files in those directories, and any directories in those directories, and so
on".
Now that your project files are on your host machine, it's time to ACTIVATE
THEM! One way to do that is to directly access the raspberry pi over the
network. Run the command ssh yeti@192.168.99.72 (again, replace the IP
address with your own pi's address and the user name with whatever you set up
in the earlier step).
After this command runs, you will be "shelled in" to your raspberry pi. Think
of it like the terminal is now that computer's terminal. If you type ls you
should see the "my_server" file and the "static/" directory you pushed with
rsync. If you type pwd (print the working directory) it should show you
that you are "in" the /home/yeti/ directory.
Start your server by running ./my_server. (If you get an error that says
something about this file not being executable, the cure is the command sudo chmod +x ./my_server "change mode, add executable"). This should behave
exactly like when you did go run main.go earlier. The terminal may appear
"frozen", BUT!
Open a browser back on your development machine (or any computer connected to your home network) and type the raspberry pi's address into the URL bar. You should see your web page! Now you can access it from any machine on your network, but not from the internet outside. You are one step away.
(leave the ./my_server command running, but when it is time to cut it off you
use "Ctrl+C" again to kill the process, and then just type exit or logout
to disconnect from the raspberry pi.)
Forward ports from your router to your raspberry pi
First, access your router's admin page again. Jump back to this section if you need a refresh.
In the admin page, you are looking for a particular category of network setting called NAT or Network Address Translation. Within that category, you should see the settings for Port Forwarding.
What is port forwarding?
So your computer (really your network adapter, if you're connected thru Ethernet and WiFi, your computer will actually have one IP address for each connection) has an address on the network that we call the IP address. When you send a request, you are specifying an IP address (or a way to resolve it when you're using a domain name), and you're also specifying a port. You can send a request like 192.168.99.72:80 which explicitly requests port 80, or you can use a URL scheme to implicitly specify the port like http://192.168.99.72 because the "http" requests are handled on port 80 by default.
Most websites today use https, which has a default port of 443, but the thing we've made so far in these steps is an http server. I'll post more instructions later for how to upgrade it to https.
The point of all that is that the server on your raspberry pi host is listening for requests on port 80. You can hit that port from inside of your network, but you want to be able to call your mom or friend if you have one of those and say "Hey, go to such and such address in your browser," and then they see that you've edited the index.html into a mothers day card or birthday card or literally whatever you want. Your router is the "gateway" between your network and the internet, so you need people from outside your network to send requests to that gateway, and the gateway to "forward" those requests to your host machine's "port" 80 (we got there!).
So once you've found the page in your router's admin console that let's you set up port forwarding, add a rule like:

I wish I could be more specific with this, but hopefully the screenshot of my own console is helpful. The port 80 rule is the only one you need to worry about for now, and by the time you would care about the other two it will be so easy for you. The rule is saying, "Router, when you get a request to YOUR port 80, forward that request to port 80 of the device at 192.168.99.72".
You might have already guessed that the port 443 rule is for forwarding https requests. The port 22 rule forwards SSH requests (which don't do that yourself until you really know what you're doing or some ding dong is going to hack you).
Now, if someone types the IP address of your router into their web browser they'll get the page you're serving from your raspberry pi. Incredible!
Is that my gateway address?
It is not. Think of your network like a house. The gateway is the directions from inside your house to the front door. What you need is the street address from the outside. Fortunately, this is easy to get. Some of you may have done the thing where you google (🤢) "what's my public IP?" and some website tells you. The way this works is that when you send a request through your router to the internet, all of the computers that receive that request know what address it came from, so google just says your own address back to you.
The way I do it is basically curl -4 icanhazip.com.
That's a handy free web service you can use from your terminal. DO YOU LOVE YOUR TERMINAL YET?!?
So now you should have a port forwarding rule set up that tells your router that when it gets a request to port 80, it should forward that request to your raspberry pi's address on port 80 so your web server can respond to it.
You can test this in a browser by putting your public IP into the URL bar. I like to do this from my phone, off the WiFi, so I can eliminate any kind of weird mistake where I think I'm accessing my site over the public internet, but it's really only going over the local network.
Run the server as a service on the host
At this point we just have a program that we have to run.
What we want is a service that starts when the computer (raspberry pi) starts and restarts if it crashes for some reason. So here is how to do that. It's pretty easy on Linux!
We are going to define a service file on our development machine, use rsync
to push it to the host, and then shell in to move the file to the appropriate
location and run the command to activate it.
Using whatever name you gave your "my_server" file, create a new file called something like my_server.service
Edit this file as if it were a text file. Add:
[Unit]
Description=My Server
After=network.target

[Service]
WorkingDirectory=/home/yeti
ExecStart=/home/yeti/my_server
Restart=on-failure
RestartSec=5
The "Description" line is just how the service will be identified in some logs. It is not super important, but don't make it something you won't recognize if you saw it in a pile of random information.
The "After" line means, "don't start this service until the network service is up." Which we need because our server is dependent on the network adapter.
This is the meat of the file. It is the thing that tells the operating system to execute the server file when it starts (after the network is online)
Hopefully it is obvious by this point that the yeti part should be whatever
you named your user on the raspberry pi and the my_server part should be
whatever you named your web server file when you built it.
Next, push this file from your development machine to the host with the command
rsync my_server.service <your raspberry pi's ip>:/home/<your host's user name>
Now you need to shell in again: ssh <your host's user name>@<your host's ip>
If you type ls you should see the service file you just made in the home
directory of your host. We need to move it to the correct location in the
file system. Enter sudo mv my_server /etc/systemd/system/ into your terminal.
If your ssh configuration was not based on an encryption key, you will be
prompted for the password again at this time.
What's this do?
sudo: means "as a Super User, DO this"- a super user has unrestricted access to read and write to the file system.
mv: this is the "move file" command. We are passing it two arguments. The first is "the file to move" which we're specifying as themy_serverfile, or whatever you named it. The second argument is the location to move that file, which you might be able to interpret at this point. The reason we needed to usesudois that the/etc/directory, and all of it's children are restricted to "normal" users.
Next, we shall use systemctl. God help you.
J/K, it's easy.
Enter sudo systemctl enable <whatever you named your service file>
That's it. That should do it. That was so easy. Unless...
To make sure it worked, type systemctl status <whatever you named your service file>
It should look something like this:

If you see an error message, you can maybe google it